Essential Feedback and Survey Tools

Use these ‘Voice of the Customer’ Tools to gather qualitative data on your customers

Web analytics can provide the what, the when and the how, but struggle to deliver the why and the rationale which explains the numbers from your analytics tool. ‘Voice of the Customer’ tools can run continuously in the background, be focused on specific pages or be time-based, gathering detailed feedback on barriers to conversion, design issues, user confusion – all useful and actionable insight for marketers.

These tools allow you to go beyond the quantitative insight of analytics tools and provide a deeper layer of site visitor feedback. Tools in this category are growing in popularity and include general website feedback, crowd sourced product opinions and exit survey functionality.

Key things to consider before purchasing and using these tools:

  • Be careful not to request too much data. Just like us, users are put off by surveys that are pages and pages long, feedback forms and exit surveys should be as short as possible to collect the insight you’re wanting to capture.
  • Response rates can be low so bear this in mind if wanting to capture specific insight on a campaign or product (volumes may be an issue). Incentivising responses can help to increase uptake but may also skew the responses to a less representative sample.
  • You may want to experiment with different capture methods, both the way feedback is requested (i.e. on-site pop-ups, vs. tabs vs. email) and the data fields (i.e. drop downs vs. free text fields) used.

Survey Monkey

Survey money is a great option for traditional customer or site visitor research prompted by email or on a website. It’s the best-known survey service, popular thanks to its free option and the paid versions are a modest price. Its simplicity (along with the free option) goes a long way to explaining why it is so popular.

Key features:

  • Skip logic, filters and cross-tabs (paid versions)
  • Range of export options.
  • Local language support

Polldaddy

Polldaddy is a great tool for quickly creating stylish customer or site visitor surveys. We love this tool for quickly creating stylish surveys with a range of questions types. The free version isn’t restricted, apart from the presence of branding. We believe it’s easier to use, is better for more advanced survey options and provides better reports than Typeform. It’s ease of use and style of templates make it stand out from the competition.

Key features:

  • Great drag and drop question editor
  • Range of 19 question types including support for Matrices / Likert questions.
  • Good range of export options including Microsoft Office options.

Typeform

Typeform lets you produce simple, interactive looking surveys. In terms of aesthetics of the finished survey, it’s the best option out there. It’s simplicity of the finished design and quality of its interactions, particularly for mobile devices make it stand out. Typeform is a highly rated new entrant suitable for user-friendly consumer surveys on mobile. It is less suited to research or more complex surveys than the two preceding options in this category.

Key features:

  • No volume restrictions on free version
  • Branded thank you page on paid version
  • Calculation and skip logic on paid versions

Hotjar

Hotjar is an all-in-one analytics and feedback tool helping you to truly understand your web and mobile site visitors. This is a relatively new tool, but we prefer it to some of the existing services since it also enables questions to be asked on some pages for qualitative feedback. Other tools in the category don’t all provide insights from prompting visitors with polls.

Key features:

  • Heatmaps: Visualise your visitors clicks, taps and scrolling behavior.
  • Recordings: Eliminate guesswork with recordings of real visitor behaviour on your site.
  • Polls: Understand what your visitors want and what’s preventing them from achieving it.
  • Funnels & Forms: Find the biggest opportunities for improvement and testing by identifying on which page and at which step most visitors are leaving your site.

Confirmit

Confirmit is an enterprise VoC option for large-scale surveys deployed across multiple segments, product categories, business units or countries. Confirmit covers the range of the Voice of the Customer process, from program definition and design to analysis, reporting, and action management. It is a powerful tool, but expect to pay an enterprise level price for it.

Key Features:

  • VoC programme management Survey
  •  Reporting and workflow management
  • Survey Reporting and workflow management
  • Reporting and workflow management


Download resource – Essential Digital Marketing Tools

This free 100+ page guide explains why we have chosen the 5 tools in each category and gives links to all the tools.

Access the Essential Digital Marketing Tools 2017


Source

Essential Ecommerce Cart Recovery Tools

Use these cart recovery tools to nudge your customers into converting

Cart recovery tools use email and on-site notifications to drive users back into a site (usually the checkout pages) with the aim of driving incremental transactions by reminding customers of the products or services they abandoned.

With initial customer acquisition becoming increasingly expensive, brands have focused their efforts in trying to re-engage and convert those users they’ve already spent money acquiring and/or who have already expressed some level of interest in a product or service. Cart abandonment is the use of remarketing at the closest point to conversion i.e. once a user has added something to their cart but fails to check out. Cart abandonment tools can therefore be an extremely cost effective way of increasing sales, and usually generate great returns on investment. If you are considering investing in a cart recovery tool for your website, here are some of the top providers to consider.

Convert

Key things to consider before purchasing and using these tools:

Read more

Getting Started with Google Optimize

After months of anticipation, Google has finally graced the analytics world by releasing a free version of Google Optimize, their new A/B testing platform. Google Optimize is just starting to rollout to early users who signed up for early access. If you have not signed up yet, it is not too late! For those of you who have experience with other popular A/B platforms (Optimizely, Unbounce, etc.), think of this as another tool in your optimization tool chest. If you’re new to the A/B testing game, don’t panic! This is a great platform for getting started on the path to optimizing your site’s user experience.

Also…did I mention it’s free?

One clear strength with Optimize is the ability to link directly to your Google Analytics (GA) Property. This makes it much easier to access data on your testing experiments than other optimization platforms. Optimize is also natively built into Google Tag Manager (GTM), making it easy to add the platform to your pages.

Today we’ll go through the process of adding Optimize and starting a test on our homepage. Feel free to follow along as you build out your first Optimize experiments on your site!

Create your account & container

First, we need to set up an account and subsequent container. Sign in to Optimize and you’ll be prompted to create your account. Following the account creation, add a container (preferably with the domain of your site):

image_1

First step – done. Not too bad, right?

Link Optimize to GA

Once the container is created we’ll link Optimize to our GA Property. Click Link Property and select your property from the list:

image_2

Add Optimize to your site

Now we need to add the Optimize snippet to our site, and this can be done in several ways. First, let’s take a look at the two code formats; standard code vs page hiding code.

With standard code, your Optimize tests will work properly, but the site visitor may see what’s called a “page flicker.” It’s essentially a brief flash on the screen where they first see the original page and then quickly see the experiment version of the same page. It’s not a huge problem per se, but Optimize does have a way around this issue.

By adding a separate page hiding code snippet you can prevent these flickers from occurring on your pages. This is the preferred way to deploy your Optimize code. To stop the flickers the page hiding code needs to go at the top of every page where you plan to add Optimize. The code should be placed after the opening declarations and absolutely before your GA/Optimize/GTM code (example below alongside GTM):

image_3

For the example in this post, let’s assume we want to add Optimize with the page hiding snippet. If you have GTM, use the following instructions for adding your Optimize code. If you don’t have GTM, head over to this section for hard code instructions.

Adding Optimize via GTM

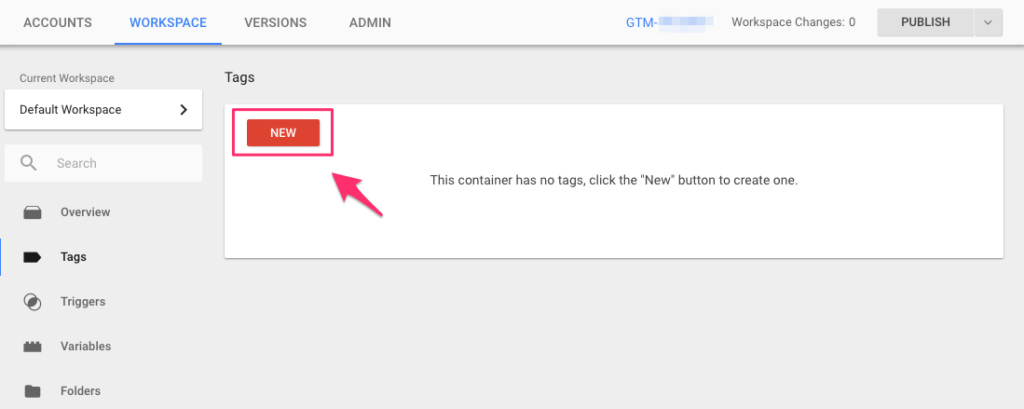
The first step is to build the tag in GTM. Go to your GTM container and add a new tag:

image_4

When choosing the tag type, select Google Optimize:

image_5

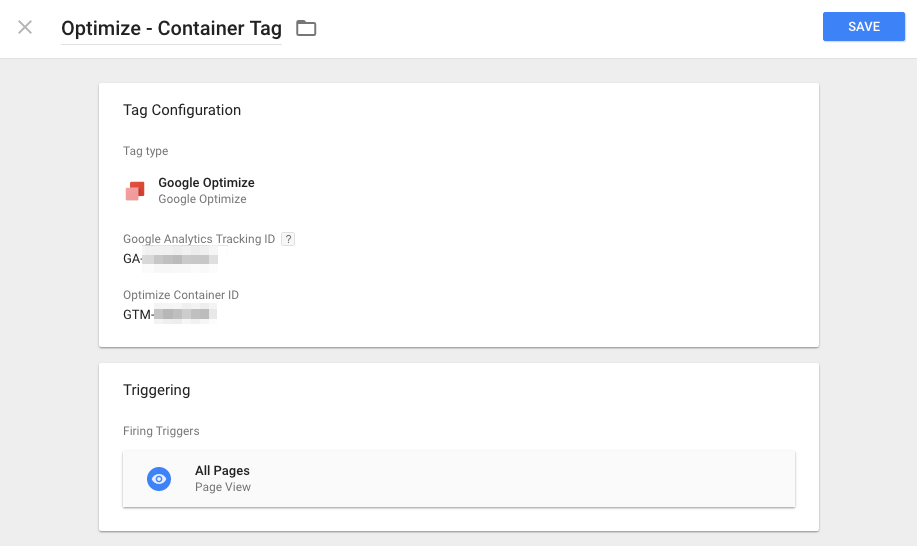
Give the tag an obvious title (I went with Optimize – Container Tag). Add your GA Property ID and Optimize Container ID to the tag, and set the trigger for All Pages (or at least any pages you know you’d like to test):

image_6

Once you publish the GTM container you can use Optimize, but remember that we want to add the page hiding snippet. Unfortunately, this has to be done outside of GTM, as the code needs to go above your GTM container. Add the following snippet at the top of all your pages where Optimize/GTM will fire. Make sure to replace the GTM-XXXXX with your GTM container ID, NOT the Optimize container ID.

image_7

Click here to skip the hard code section.

Adding Optimize via hard code

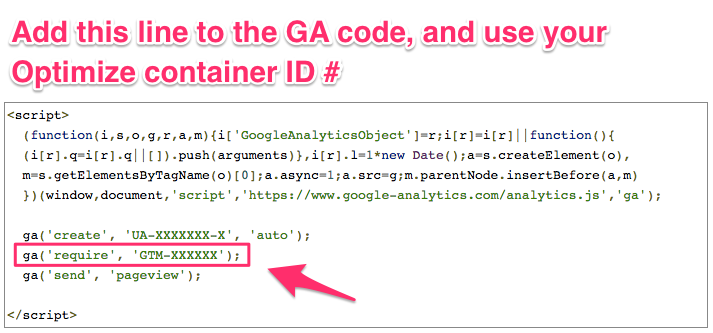
All you need to do is add one line of code to the standard GA code. Here’s the one line:

image_8

And here’s how it will look inside your GA code:

image_9

Replace the XXXXX with your Optimize container ID #. This can be confusing since the code says “GTM”, but make sure you use the Optimize ID #, NOT your GTM container ID.

Now you’ve added Optimize to your site!

Create an experiment

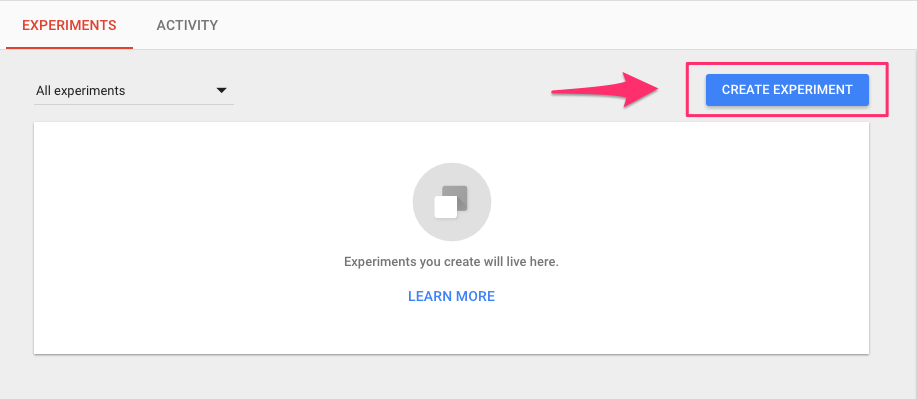
Put on your lab coat – it’s time to build some experiments! Click on Create Experiment to begin:

image_10

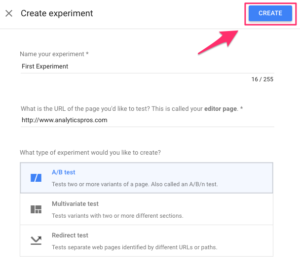
Give your test a name and define which page you’d like to test. The next step is to select the type of experiment you’d like to run. There are three types of experiments in Optimize:

  • A/B Test: Test one variable change on two or more variants of a page.
  • Multivariate Test: Test multiple variable changes on two or more variants of page(s).
  • Redirect: Test variable changes on pages with different URLs.

For this example we’ll stick with the A/B Test option. Select that type and click Create:

image_11

Add a hypothesis and objective

Now that we’re in the Experiment details it’s time to set the experiment hypothesis and objective(s). For this test let’s propose the following hypothesis:

If we enlarge the header links on the homepage, we will receive more traffic to our blog.

Add your own hypothesis into the Optimize and pick the metric you will use to measure the experiment’s objective. Note that you can only use these metrics for your objective:

  • Goal Completions
  • Pageviews
  • Session Duration
  • Bounces
  • Transactions
  • Revenue

For this example we’ll use a goal that triggers each time a blog page is viewed.

Create experiment variants

For our experiment, we need to add a variant to compare to the original page. Click + New Variant at the top of the details page:

image_12

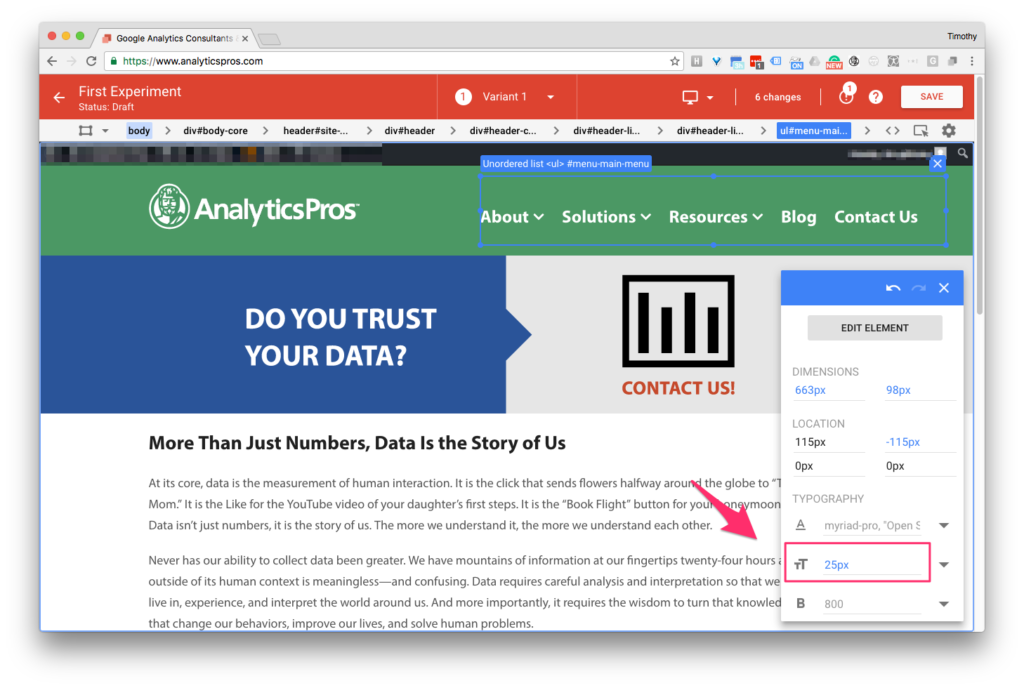
Once you’ve named the Variant, click on it to go to the Optimize editor. This is where you can manipulate all sorts of elements on your page. We’ll cover these options in a later post, but for this test let’s increase the size of our header links:

image_13

We’ve selected the link group and increased the font size by 5pts. Once we’re satisfied with the variant click Save to update the variant.

For A/B Tests make sure to only change one element on the page per test. If you change multiple elements you can’t declare with certainty what was successful (or unsuccessful) in your experiment.

Experiment targeting

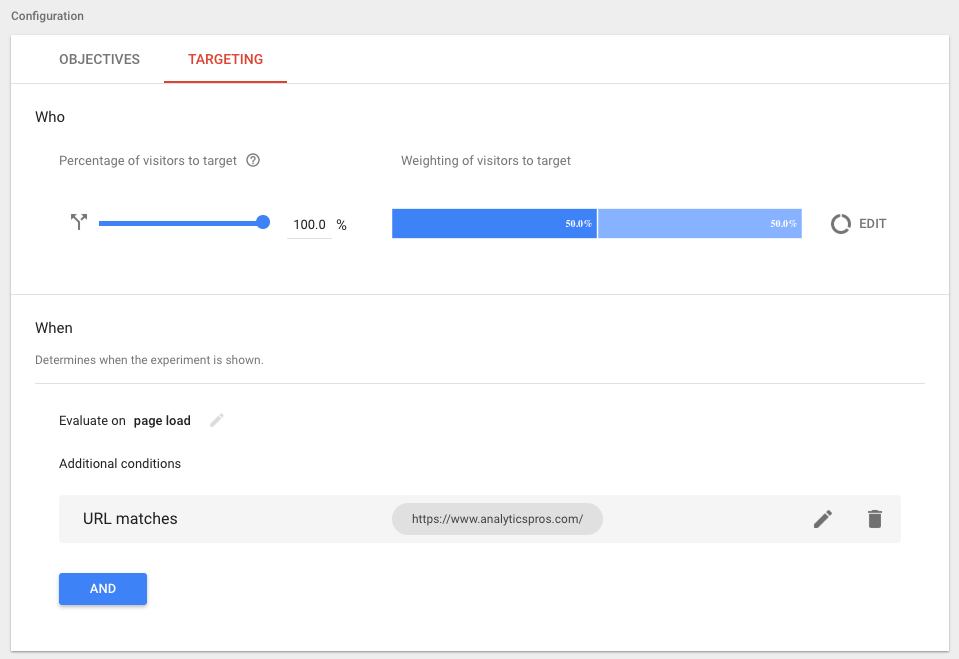
To send your experiment to specific users you can use the Targeting options in Optimize:

image_14

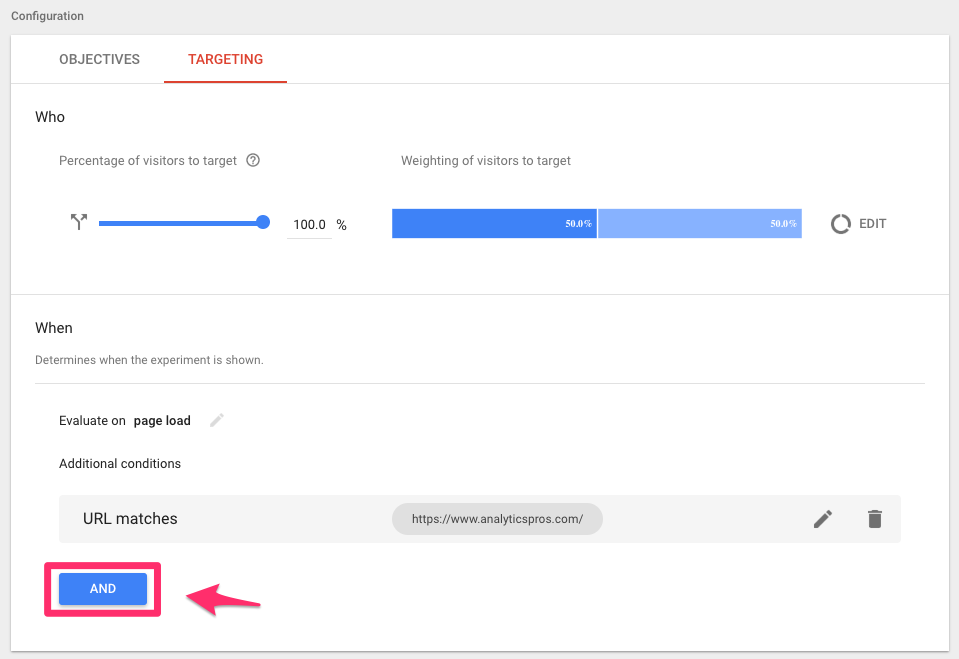
In the Targeting you can edit how much overall traffic sees the experiment, how much traffic each variant receives, and pick specific audiences to receive the experiment. We’re going to target only Desktop users for this test. To do this click on the AND link at the bottom of the page:

image_15

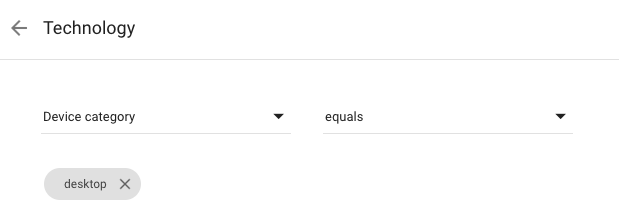
We select the Technology rule and set up our rule like this:

image_16

Test & Start the Experiment

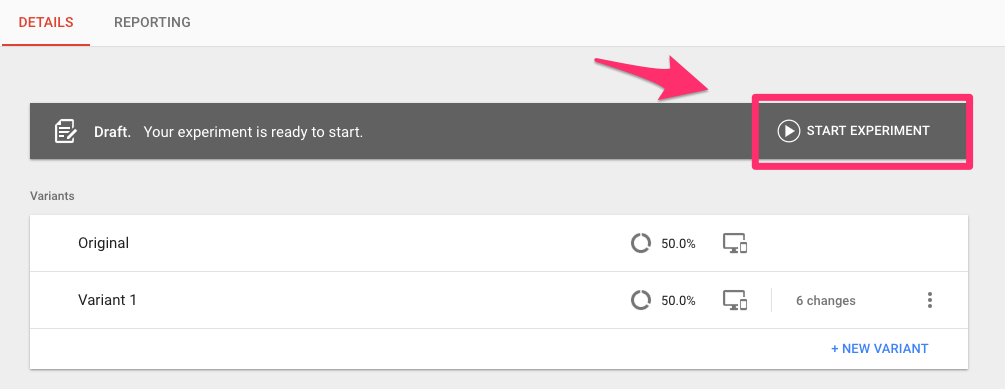
After double-checking to make sure the variants and targeting are set up correctly, you can begin your experiment. When you’re ready, click Start Experiment:

image_17

We recommend checking in on the test details daily for the first few days to make sure everything is running properly. Make sure to see the variants of the test live on your site to make sure they look the way you want.

To check on the progress of your experiment go to the Reporting tab in Optimize. This report will tell you how each variant is performing and when you’ve reached a proper confidence level to end your experiment. We’ll cover this aspect of your tests in a later blog post.

Now that you’ve started an experiment, here are some best practice to keep in mind while using Optimize:

  • Don’t run multiple tests at the same time on a page. You can surely run multiple tests on your site, but set up the targeting so they don’t cross over each other.
  • Give your test plenty of time to bring in data. The amount of time is different for everyone, as it depends on how much traffic your test receives. But a general rule of thumb for a good medium is 30 days.
  • Always have another pair of eyes go to your test variants to make sure the page looks intact. If you’re not careful, editing page elements can shift other aspects of a page improperly. This is especially good to keep in mind when testing across desktop and mobile.
  • Get creative! This is your chance to try something you’ve always been curious about for your site. Whether or not your variant wins the experiment, it’s a great way to constantly try new things for your user experience.

Source